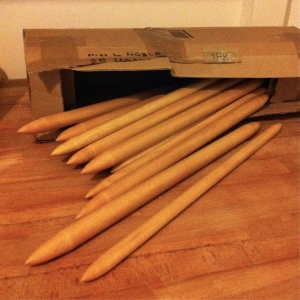
Cat basket in progress

IMG_1426

For a knitting pattern to be successful, it has to be thoroughly tested.  Just as important, it must be easy to find the tools and materials needed to make it.

My giant wool cat basket is knitted in the round.  I’ve always made it using large 20mm doublepins.  Back in 2012, you couldn’t buy oversized doublepins anywhere, so I asked my Uncle to make some for me.  Many cat basket orders later, and a change of wool supply, I am still happily knitting these on the oversized doublepins.

Since then, extreme knitting has come on in leaps and bounds.  There are lots of giant yarns available from specialist suppliers, in both wool and acrylic.  You can even get giant circular needles for making those eye-popping blankets and throws.  But you still can’t get giant doublepins.  So how was I going to make my pattern appealing to knitters, if the tools for the job were not available?

Then I discovered the Magic Loop method.  This is how you can knit even the smallest circumference on any length of circular needles.  I tried it and found it really simple.  I knitted the whole basket this way and it worked a treat.  Then I knitted the whole basket in reverse – from the outer rim to the centre.  That worked too!

Next is to test knit the basket again, using 1kg of easily available arm knitting yarn.  Step forward Dove Grey acrylic from Woolly Mahoosive!  Let’s see how the basket knits up with this yarn…watch this space!

Knitting and Me are Back On

I knitted my cat basket in t-shirt yarn. It turned out much better than I expected.

photo 3

I have had this cone of t-shirt yarn on the shelf for more than 6 months.  I never thought it would work. T-shirt yarn is quite floppy, not stiff like the semi-felted wool I was using before. That’s why I thought it would never work as a basket – the sides have to stand up unsupported. But I was wrong. The sides stand up beautifully.

Until Larry came along and curled up on top of it.

Larry flattens the new basket

Larry flattens the new basket

It was good to get Larry’s seal of approval.  But I have to make an adjustment. The new yarn is thinner than the semi-felted wool, so the basket knits up smaller. Larry is using the entire basket as a pillow.

Time to make a bigger basket.  Here goes with the next size up. I’ve got just enough t-shirt yarn left to make the medium size. This works out a lot better for Larry.

Larry in the medium basket

Larry in the medium basket

The t-shirt yarn is delightfully easy to work with, maybe because of the generous stretch it has. Fortunately I can use the same set of doublepins I already have. Most exciting of all, t-shirt yarn is easily available in every colour under the sun. Wow, how exciting is that?

I went online and ordered a load of fabulous colours.

Knitting – me and you are back on!

Till next time,

L x


A Week in my Studio

I just had the luxury of spending the entire week in my studio, having taken some long overdue leave from the FTJ (full time job). Allowing myself more or less all day to plan, create, and knit has been wonderful.

You can see from the sheer amount of clutter on the desk that a few projects are in progress.

Works in progress

A knitting pattern is ready to be posted, there are sample basket bases, a part-finished knitted handbag, some completed cotton cloths, double pins, needles, thread, and a pile of spiral coasters. I am loving the spiral coasters, even though they are not knitted, just sewn in place. I decided to take some pictures of them, with Larry’s help.

Thanks for helping, Larry!

Thanks for helping, Larry!

That's better!

IMG_2573

I think the cats have enjoyed having me around the house all day. There is usually one or two hanging out with me, either on my lap or in one of the baskets.

IMG_2600

The FTJ next week is going to be insane, as I will have loads of catching up to do plus lots of preparation for a trade event next Friday. But I must try to harness this week’s creativity and motivation, and continue with it in every spare moment.

I’ve got to design more patterns!

Happy crafting!

Till next time,

L x

Baskets Galore

Fair bit of progress this week as I’ve knitted 4 complete baskets.  I’ve also had a total re-think about the construction which has given me the best result so far – with a nice flat bottom!

Extreme Knitting baskets

Extreme Knitting baskets

Monty is a big fan of the woollen cat basket and I knew he would hop in before long.  I wondered which one he would go for. Spread himself out in the big one, or fold himself up into one of the smaller ones?

IMG_2378

Ah, he went for the big one.

Then he changed his mind.

IMG_2377

I tidied up, and discovered that 3 of the baskets make a nice little ‘basket nest’.

Seems Monty approves of this too.

IMG_2381

Herbie likes a woollen baskets to snooze in.  He squeezed himself into the smallest one so far, before I’d even fastened it off.

IMG_2359

IMG_2356

Now for a radical departure: I’m going rectangular.

IMG_2374

Let’s see if I can finish this off before making a start on dinner.

Oh, wait…

IMG_2385

It’s not looking likely.

Till next time,

L x

Something Completely Different

It doesn’t feel much like Easter here in Sheffield, what with all the snow and ice and not a single crocus or daffodil in sight. But making some clothes for a toy bunny is quite appropriately festive for the time of year.

After spending weeks working on the extreme knitting cat basket, it was time for a change. So I put the giant needles away and  started to think about Mrs Bunny’s new wardrobe.

Mrs Bunny belongs to the daughter of a very dear friend. She has been so loved that she has lost all of her fur and looks quite undressed. A new set of clothes is in order.

This is such a fun project for me. I don’t have to try to be stylish or subtle.  Pink, fluffy, and cute is my design brief. Of course, Mrs Bunny isn’t here for me to constantly check the fit, so I am working from detailed measurements and hoping for the best.

First I thought I would make a dress. I had a look through my stash and settled on a dusky pink DK, with a slubby, fluffy white contrast. My design included some pearly beads and a couple of heart motifs.

As always, minimal sewing is my aim so I started at the hem on double pins and worked upwards in the round. I divided for the armholes and left one shoulder open for getting the dress over Bunny’s head.

That was the plan, anyway. But the first attempt threw up some issues. The lacy heart motifs were supposed to be topped with a small bobble, so that they looked like rosebuds. But my bobbles were so messy that they had to go. Omitted, the rosebud became a heart.

I found I was working in the round with the wrong side facing, so every row was a P row. This meant I had to convert the pattern for the lacy rosebud/heart from knit-based to purl-based.  I managed to do this OK, but why make it this hard? Why not just work with the right side facing?

The other problem with working purl rounds with the wrong side facing, was that my decreases were untidy. I was placing some decreases as I progressed up the skirt to the waist, to create a flared shape.  I found that P2 together was not as neat and subtle a decrease as K2 together. I also had not placed the decreases evenly between the heart motifs.

Then I checked the measurements and realised that Mrs Bunny’s dress was far too big. Time to unpick the whole thing, address all of these issues and start again.

For some reason I found it really hard to cast on 88 stitches, join in the round and have the right side facing. So I knit one row first, then joined in the round. That did the trick and I was away. The lacy heart motifs read easily off the page for K rows.  I found the optimal spot for my decreases and worked them beautifully with K2tog.

Mrs Bunny's new dress

Mrs Bunny’s new dress

I found a pearly button to finish off the shoulder fastening. Ain’t it pretty?

Now I’m making a tweedy jacket to go with the dress. Fingers crossed that they fit!

Till next time,

L x

New double pins are here!

IMG_2007

My hand-turned double pins have finally arrived! Two different sizes, each 40 cm long. Now for the first time I can make seamless baskets and containers using thick semi-felted wool.

So I set off knitting the base according to my existing pattern which I wrote for the seamed baskets. Here’s Larry checking out my progress.

IMG_2008

The old basket is nowhere near big enough but it was as large as I could go on two pairs of ordinary 20 mm needles.

A convenient facet of working on this large scale is that it’s easy to pull the needles out without losing track of the stitches. Every few rounds I would pull out the double pins and check the lie of the circle so far. I wanted it to be as flat as possible. A basket needs a nice flat base. Unfortunately, I appeared to be knitting a dome.

I unpicked my work a few times and tried different patterns of increases. But the dome would not go away. Hours went by and I wasn’t getting anywhere. Why was working this pattern in the round so much harder than on two needles? Was the puckering caused by too many increases, or too few? I looked at my work again, and realised I was reading it incorrectly. I had to take a completely different approach to working the increases. Keeping the unsatisfactory domed circle as a guide, I found the other end of my yarn and started again.

Exhibit A: the dome. Exhibit B: the circle.

Exhibit A: the dome. Exhibit B: the circle.

We met some friends for dinner at a restaurant. Even then I was thinking, ‘maybe I should have started off with 4 stitches instead of 6. I’ll try it tonight before I go to bed’. I was determined to get a better result, to the point of obsession. I started to completely remove the double pins after every round, so that I could press my circle out flat and see how flat it really was. Here’s Larry helping me with my assessment.

IMG_2054

Through all the hours of trial and error, I was learning a lot about the fibre and the way it behaves on those needles. All good experience, and good experience is never wasted. The basket base is not completely flat, but it is definitely no longer a dome. And in the finished article, the fibres will settle, and the base will flatten with use. My basket base now measures half a metre (20 inches) in diameter, and I’m halfway up the sides.

IMG_2060

I am hoping that I will have enough wool left to complete it, without having to unpick my former prototype. But I won’t be working on it tonight, because at this moment Herbie is settled down in it, having a good wash and a stretch, framed by the five double pins, and Monty is making do with squeezing himself into the little basket alongside.

Till next time,

L x

Waiting for new needles…

I just heard from my lovely Uncle that he has made me the two sets of oversized double pins I need to make the biggest and best possible wool baskets. According to my many prototypes and pattern re-writes, this is the way forward. My Uncle is retired and doesn’t  do much woodworking any more, but just for me he sourced the wood and turned the needles to my measurements. I am a very, very lucky knitter.

Monty has been asking for a bigger basket for some time.

IMG_1845

IMG_1855

IMG_1857

Now Monty is able to fold himself up quite small, but even so, this basket is a tight fit for him.  Larry on the other hand, just spills out of  it.

IMG_1940

Herbie would like his own basket too. He sleeps on top of it, rather than in it…

IMG_1953

…when he gets the chance!

IMG_1957

IMG_1960

IMG_1961

Till next time,

L x


Knitted Basket Progress

IMG_1834

It was going to be such a quick and easy project.  Just working part of a pattern I had already written, using super-chunky yarn on oversized needles.  I actually thought I could get it right in one or two goes.  How naive was that, I see now, after losing count of the number of attempts I have made to get it perfect.

The issue I have grappled with is getting the circular base to lie completely flat. The usual pattern of increases led to terrible puckering. Once I reached the sides and went vertical, it was relatively simple.  But I didn’t know if the base would lie flat until I had finished the sides. To save time, adjustment after adjustment, I just worked 4 or 5 side rows and pulled the needles out so that I could check the lie of the base. I realised early on that I had to work fewer increases to avoid puckering. But the exact pattern of increases was a matter of trial and error.  At the same time, I didn’t want to end up with too few stitches to knit the sides. Working out a happy balance between these two requirements was my problem. Finally I have written a pattern of increases that I am fairly happy with.

Whilst working with this yarn Monty is never far away. He is irresistibly drawn to it for some reason. Perhaps he likes the smell of pure wool. If I put my work down for a while, this is what I find when I return:

I like this!

I like this!

When I have finished yet another prototype, he comes to inspect it.

IMG_1845

He gets in and treads up and down for a bit before wrapping his tail neatly around his legs. I can tell he’s dying to make a proper bed in it…

IMG_1855

…if only it were bigger!

IMG_1857

I’m working on it Monty, I promise. This is the largest size I can make with my existing tools. My next step is to get rid of the seam and go circular. But I need lots of enormous double pins for this which will take a while to find….

Till next time,

L x

Tools of the Trade

A knitting needle is quite an elegant object in itself, before you even wind some yarn around it. I like having a big pile of needles to choose from, in the same way as having a big stash of yarn to drool over. As I come from a family of knitters, I have been lucky enough to inherit sets of knitting tools from my mother, aunt and grandmother. Each set is wrapped up in a home-made fabric holder, with the needles sorted roughly into sizes.

Most of the needles are the old-fashioned Aero steel needles, with some wood and some plastic in the larger sizes. There are two of these lovely little bell gauges:

bell gauge

I spent a happy evening checking the sizes of all the needles in the bell gauge and I found I had lots of duplicates.  A bit of a clear out was required, and Larry was on hand to help.

When we’d finished, we had one roll of everyday, mid-sized needles:

One roll of oversized needles:

And one entire roll of double pins:

Jesus, my ancestors must have knitted a lot of socks!

I hope you have enjoyed this little tour around my toolbox.

Till next time,

Lx

It’s a knitting revolution!

Ooh it’s my first blog post!  Been meaning to have a proper blog for ages and now I’ve finally got one.  I’m not the sharpest tool when it comes to the technical stuff and it’s taken me most of the day to work out how to get my page to look just so. Now I must post something so that it feels like I’m off the starting blocks. (mmm, topical metaphor there).

But I’m not here to go on about the Olympic Games, fabulous though they are (did you see the cauldron being lit? Wow!  And the Queen!).  No, this blog is all about creativity and design.  I design things in yarn.  Mostly cakes.

Flower Cupcake

The Flower Cupcake

A while ago I wanted to knit a cupcake.  I googled like mad for a pattern, but didn’t find any that were quite right.  There were some very good designs out there, but they either did not have the detail I was looking for, or the construction involved sewing together various little pieces.  Now, as a lifelong knitter, I know that knitting is the fun part.  The sewing and seaming is a pain, a necessary evil that all knitters have to take in their stride at some time.  Or the project might never be finished.  Unless it’s a scarf.  That’s why there are hundreds, no, probably thousands, of unfinished projects stashed away in drawers and attics the world over.

So I set about designing the ultimate knitted cupcake.  Starting from the bottom, I made an attempt with no seam at all, working in the round on 4 double pins.  But I came unstuck when I got to the top and had to think about inserting a cardboard disc and stuffing.  It didn’t work.  So then I decided to aim for one piece with one seam.  I still had to use a couple of double pins in the first few rows, to allow for the multiple increases, but I found I could switch back to 2 needles once I’d worked the sides.

Then I had a brainwave.  A picot edge would nicely suggest the crimped sides of the cupcake case.  So I did a ‘pick up and knit’ on the last row of white, and worked a 2-stitch picot all around.  All I had to do now was to cut a cardboard disc to snugly fit the bottom, stuff, and sew one little seam.  Then a flower and a bead to finish.

Using this basic construction, more designs followed.  Obviously I had to knit a butterfly cake:

Butterfly detail

The Butterfly Cupcake

Then, inspired by the pattern of 8 decreases per row on the cupcake top, the Spider Cupcake followed:

Spider Cupcake

The Spider Cupcake

I never thought I’d be knitting cute spiders to decorate toy cakes.  On a bit of a roll, I then produced the Rainbow Ladybird Cupcake, Goodness knows where this came from:

Ladybird Cupcake

Oops, forgot to do the picot edging on that one.  More of a bun, then.  I had a lot of fun making these bug-topped items.

I made a few more pink flowery-type cupcakes and the obligatory Christmas Cupcake, but the Flower Cupcake was the first design and turned out to be the bestseller.  So far I have only sold the patterns, not the finished items.  This is simply because I don’t have time to knit a lot of cupcakes and I would get bored making more or less the same thing over and over again.  Besides, I get the biggest kick from working out the details of a design within the limitations of some yarn and two needles.  So, on to the next design!

http://stores.ebay.co.uk/knittingrevolutionpatterns